How to install an eSIM on iPhone - step by step tutorial
You've purchased an eSIM plan for your trip and now you want to install it on your iPhone? The process is surprisingly simple and takes just a few minutes. Unlike physical SIM cards that require opening the SIM tray, an eSIM is activated completely digitally by simply scanning a QR code.
In this detailed tutorial, you'll learn exactly how to install an eSIM on iPhone, step by step, with screenshots and clear explanations for each stage. Whether you have an iPhone 15 Pro Max or an older iPhone XR, the process is the same and works perfectly on all compatible models.
What you'll learn in this guide:
- Preparing your iPhone for eSIM installation
- Scanning the QR code and activating the profile
- Setting up Dual SIM for travel
- iOS 18 updates for eSIM
- Troubleshooting common issues
What you need before you start
Before installing your eSIM, make sure you have the following:
1. eSIM-compatible iPhone
eSIM works on the following iPhone models:
- iPhone 15 (all variants: Pro Max, Pro, Plus, standard)
- iPhone 14 (all variants)
- iPhone 13 (all variants)
- iPhone 12 (all variants)
- iPhone 11 (all variants: Pro Max, Pro, standard)
- iPhone XS, XS Max, XR
- iPhone SE (2020, 2022)
How to check compatibility: Settings → General → About → look for "EID" or "Digital SIM Available"
2. Network unlocked iPhone
Your iPhone must be network unlocked to use an eSIM from another carrier. If you bought it directly from Apple or it's older than 2 years, it's probably already unlocked.
Quick check: Settings → General → About → "Carrier Lock" should show "No SIM restrictions"
3. Internet connection
You need WiFi or mobile data to download the eSIM profile. We recommend WiFi for a smooth installation.
4. Activation QR code
After purchasing an eSIM plan (for example from beeSIM), you instantly receive a unique QR code and activation instructions via email. Make sure you have access to this email on another device or print the QR code.
Pro tip: Don't delete the email with the QR code until after you've successfully installed the eSIM!
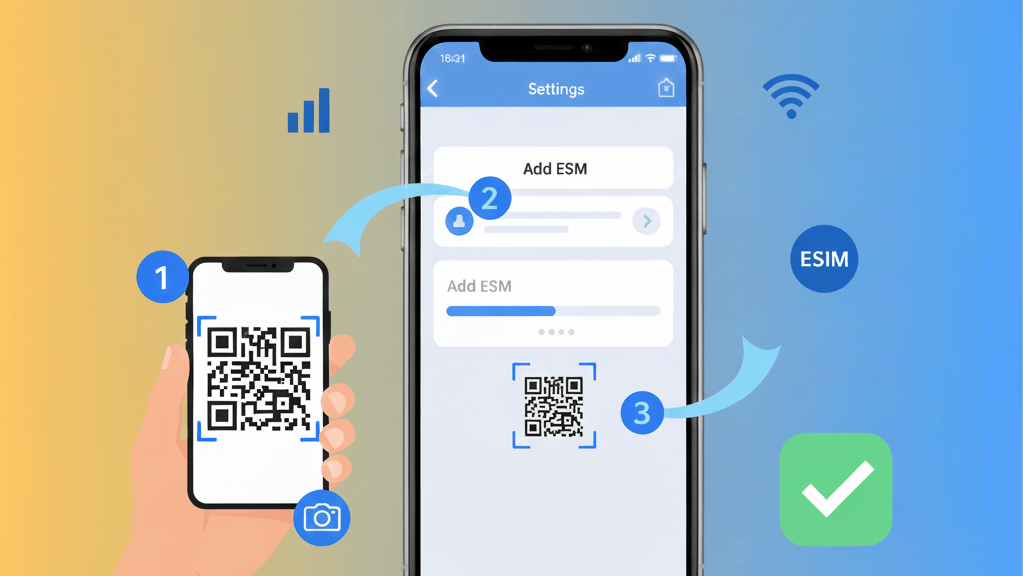
Method 1: Installation by scanning QR code (recommended)
This is the simplest and fastest method to install an eSIM on iPhone. Follow the steps below:
Step 1: Open eSIM settings
- Open the Settings app on iPhone
- Tap on Cellular (or Mobile Data depending on region)
- Tap on Add eSIM
Step 2: Scan the QR code
- Select the Use QR Code option
- Grant camera access permission if requested
- Position the QR code received via email in front of the camera
- iPhone will automatically detect the code and display plan information
iOS 18 note: If you receive the QR code in Mail or Safari, you can long-press the image and directly select "Add eSIM" without manual scanning!
Step 3: Confirm installation
- Verify the displayed information (carrier, plan, validity period)
- Tap on Add Cellular Plan
- Enter the confirmation code if requested (see activation email)
Step 4: Wait for activation
iPhone will download and install the eSIM profile. This process usually takes 30 seconds to 2 minutes. Don't close the Settings app during this time!
When you see the message "Cellular Plan Added" or when a green checkmark appears, the installation is complete.
Method 2: Manual installation (without QR code)
If you can't scan the QR code (for example, if you receive it on the same iPhone where you want to install the eSIM), you can manually enter the activation details:
- Settings → Cellular → Add eSIM
- Select Enter Details Manually
- Fill in the fields with data from your email:
- SM-DP+ Address - activation server address
- Activation Code - unique activation code
- Confirmation Code - confirmation code (optional)
- Tap Add Cellular Plan
The rest of the process is identical to the QR code method. iPhone will download and install the profile automatically.
Warning: Enter the data exactly as they appear in the email, including uppercase and lowercase. A small mistake can prevent installation.
Setting up Dual SIM for travel
One of the biggest advantages of eSIM is that you can use two plans simultaneously on iPhone - for example, your home SIM card for calls and SMS, and the eSIM for internet abroad.
Labeling plans
After installing the eSIM, iPhone will ask you to label the two plans. For example:
- Primary plan: "Home" or "Personal"
- eSIM: "Travel" or country name (e.g., "Turkey")
Setting for internet
Choose which plan you want to use for internet:
- Settings → Cellular
- Tap on Cellular Data (under plan list)
- Select the travel eSIM
Setting for calls and messages
Choose which plan you want to use by default for calls and SMS:
- Settings → Cellular
- Tap on Default Line
- Select your home plan (to remain accessible on your usual number)
Data Roaming
IMPORTANT: Enable Data Roaming ONLY for eSIM, not for your home plan!
- Settings → Cellular
- Tap on the travel eSIM
- Enable Data Roaming
- Go back and tap on your home plan
- Disable Data Roaming for it
This way you avoid roaming charges on your home plan, using exclusively internet from the eSIM.
| Function | Recommended plan |
|---|---|
| Internet / Mobile data | Travel eSIM |
| Voice calls | Home SIM |
| SMS / iMessage | Home SIM |
| WhatsApp / Apps | Travel eSIM (use internet) |
iOS 18 updates: Major improvements for eSIM
Apple introduced in iOS 18 a series of new features that make the eSIM experience much smoother, especially for travelers. Here's what's new:
1. Install before departure
In previous iOS versions, installation and activation were linked, which caused errors when trying to install an eSIM before arriving at your destination. iOS 18 separates these two processes - now you can install the eSIM at home (on WiFi), and activation will happen automatically when you arrive in the destination country.
This means you don't have to configure the eSIM at the airport or on your way to the hotel - you arrive already connected!
2. Intelligent plan switching
iOS 18 uses a combination of Siri, Calendar, Email and location to automatically suggest when to switch between plans:
- 24h before departure: iPhone asks if you want to activate your travel plan
- Upon return home: You receive notification to switch back to primary plan
No need to remember manually to switch - iPhone does it for you!
3. eSIM transfer between iPhone and Android
iOS 18 introduces support for eSIM transfer between iPhone and Android (and vice versa). This is a major change - until now, switching from iPhone to Android (or vice versa) required contacting the carrier for a new eSIM.
Currently, the feature is limited to certain carriers and Android phone manufacturers, but the list will gradually expand.
Rapid adoption: iOS updates reach over 50% of iPhones within a few days, and over 80% within 2 months - much faster than other mobile systems.
Recommendation: If you travel frequently, update to iOS 18 as soon as possible to benefit from these improvements.
Common problems and solutions
eSIM won't activate / stuck at "Activating"
Solutions:
- Verify you have working WiFi or mobile data
- Make sure iPhone is network unlocked
- Try again later - sometimes carrier servers are busy
- Contact carrier support (e.g., beeSIM) for verification
"Cellular Plan Cannot Be Added"
Possible causes:
- QR code was already used - each QR code can only be installed once
- iPhone doesn't support eSIM or has a carrier lock
- Manually entered data is incorrect
No signal after installation
Checks:
- Settings → Cellular → tap on eSIM → enable Data Roaming
- Enable and disable Airplane Mode to force reconnection
- Verify you have coverage in your area (see plan specifications)
- Settings → Cellular → manually select Network Operator
I accidentally deleted the eSIM
Unfortunately, once deleted, an eSIM cannot be reinstalled with the same QR code. Contact the carrier for:
- Transfer to new profile (if plan is still valid)
- Generate new QR code (some carriers offer this option)
At beeSIM, contact support and we'll help you with the transfer to a new profile if you accidentally deleted the eSIM.
Internet is very slow
Checks:
- Verify 4G/5G coverage in your area
- Settings → Cellular → Data Options → Voice & Data → select 5G On or LTE
- Try in a different location - you might be in a weak signal area
Ready to travel connected on your next trip?
Installing an eSIM on iPhone is a simple process that takes just a few minutes, but gives you the freedom to be connected anywhere in the world without roaming charges and without searching for SIM card stores.
With iOS 18 improvements, the experience is even smoother - you can install the eSIM at home, iPhone automatically suggests when to switch between plans, and in the future you'll be able to transfer the eSIM even to Android.
What's next? If you don't have an eSIM plan for your trip yet, explore beeSIM plans for over 180 countries, with instant activation and support in your language.